Monday, January 3, 2022

Spigot Lamp Switch for Industrial Lamps, etc.

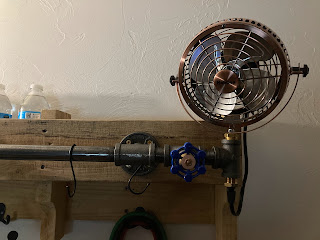
Recently, I made a new rack for behind my indoor bike. I wanted a place to hang things but also wanted an easy to access light and fan. Spigot switches made it very accessible while still sitting on the bike and add a nice industrial touch.


In the past, I've done a post on making a coat rack so what's new here is simply the application of the spigot switches and use of light and fan.

To make these switches, I used:

  • A rotary switch
  • A 3/4" sillcock valve. (used one from Home Depot (blue) and one from Ace Hardware (red))
  • Some 1/2" inner diameter (5/16" outer diameter) clear vinyl tubing (from Home Depot)
  • A 3/4" close nipple (sizes vary) (from Home Depot)
  • A washer (I had this already but any hardware store)
  • Optional glue for making sure threads don't loosen but we will not use glue to attach the spigot handle to the switch.
I hate glue and don't find it reliable long term. That said, it has its uses. In this case, the hose takes one aspect out of the gluing where I find it would typically fail--attaching the rotary switch to the sillcock valve.


After disassembling the stem from the valve, I removed the screw and washer from the stem to give myself just a little more room to work with but it's not vital unless you find space is an issue.

To attach the rotary switch to the spigot handle, cut a small length of the vinyl hose and shimmy it on both. In my case, my rotary switch was a little larger and tough to get the hose onto so I cut a 1/4" slit from the end to give me a little wiggle room to get it on.


Keep in mind, close nipple sizes vary from manufacturer to manufacturer. I found the ones from Home Depot were a little longer than the ones from Ace. In my case, I needed a little extra room so I went with the larger one.

Here, you can see everything threaded over the wire: the nipple over the wire coming out of the switch/spigot assembly and the washer that'll hold the assembly in the nipple with the nut and lock washer from the switch trailing behind.


When we fasten down the nut onto the switch, we have our finished switch.

Now, you may want to put some epoxy or glue between the big washer and the nipple and/or on the rotary switch threads to keep it from slipping over time. I did not and one of my two switches has gotten a little loosey goosey so I'm probably going to have to go back in and add a dab of glue unfortunately.

Wiring your switch to operate a lamp, fan, or other device requires a little knowledge of home electrical wiring. Obviously, always work with everything unplugged and be sure to be aware of which side of your circuit is the "hot" side.


Sunday, January 17, 2021

DIY Adapter for Surface Mount Retractable Screen Door(s)


You can find several options for retractable screen doors these days that are super easy to install provided you don't have adobe or stucco construction and you don't have level footing inside and out. Unfortunately, I was unable to use these solutions out of the box due to the following issues:

  1. Due to the need for brick molding, we have nowhere on the outside of the doorframe to install the screen slider bars.
  2. Also due to requirement of brick molding, we have nowhere on the outside of the doorframe to drill a hole for the top slide bolt.
  3. Due to the need for a step, we have nowhere to a drill hole for the bottom slide bolt (or, if you have a tiled patio, you may simply not want to). In my case, I would have had to drill into the grout.

Adapting for the Slider Bars

To create a surface to mount the slider bars, I bought two 1x4s. I cut these to the height of the doorframe and mounted them to the doorframe using 3 deck screws. The slider bars only mount with two screws each so this seemed sufficient.


Note: Initially, I thought I needed two 1x5s because the slider bolts would rub against the stucco at the top of the door but, when I received my retractable screens, I could see the slider bolt assemblies are adjustable and lower them enough to fit under the stucco edge.

To push these adapters just slightly inward to make sure they did not rest against the stucco, I used some heavy duty foam tape. I put the deck screws through the side with the foam tape and tightened them down such that there was a slight gap between the adapters and the stucco.
(above: screw fastening through gray foam tape)
(above: minimal gap between stucco & 1x4)

Creating stops for the Slide Bolts

Fabricating L Brackets

As an alternative to drilling into our tile patio or the stucco, I created two L brackets out of perforated steel to mount to the tracks. I could not find any prefab L brackets available that were short enough to work for the distance between the tracks and the bolts.


Fastening L Brackets

The most important point here is probably that you should be sure to use screws short enough to avoid protruding so far into the track that it might interfere with the screen's operation or tear it up. As a secondary point, you may have to use a washer or two to push the L bracket into the right location such that the slide bolt slides easily into the hole.


Having worked around these issues, we are able to enjoy the simplicity and cost effectiveness of retractable screens designed for brick molding doorframes.

Additional Tasks

We plan to remove the whole assembly to finish the wood and add some thin weather stripping along the tracks to avoid any lizards strolling on in.


Sunday, October 11, 2020

DIY Cold Brew

 Yes. You read that right--cold brew. I know it's not my usual thing but this stuff is good and with working at home in a warm room this summer (still 100F here in AZ in the afternoons and it's October), this stuff has been a life saver over my usual hot brew.

Parts

There's not much for me to say other than I've been loving this combination: Folgers (yeah--Folgers!) Black Silk and this gigantic mason jar brewer. I've purchased the same container of Black Silk at Safeway but I'm seriously considering putting this stuff on subscription.

Technique

The one thing I can say that might reveal a little some "know-how" is that I do not put the ground coffee in the brewer's filter--I put it outside it. That is, in the 2qt brewer, I put 2 cups of ground coffee and then I add the filter. That way, I can get a ton of coffee in there and the filter strains it when I pour.

Other than that, I check on it an hour or so after starting to make sure it's not all floating and that the grounds are fully submerged by turning it over a couple times (holding the pour spot to be sure). Have at it a few hours in if you must but I like it when it's hit a good 12-24 hours of brewing.

Drink it however you like but I will tell you I do 1/2 brew, 1/4 ice, and 1/4 water or, when I want something really thick and refreshing, 2/3 brew with 1/3 whole milk.


Sunday, September 20, 2020

DIY Fan Wobble Elimination

Fan wobble can be unnerving, frustrating, and even scary. Sometimes it's associated with disconcerting noises and sometimes it's just distracting. For me, I figure too much movement is going to cause a problem with fasteners eventually.

What can you do?

First, we need to figure out the problem. Consider these common problems:

Is a blade bent? Sometimes a new blade can be all it takes.

Is everything fastened tightly? Sometimes those screws that were tight initially have loosened up due to compression of parts.

Is the box designed for a fan? This may require fan removal but better to be safe than sorry.

Is the box properly supported? This will probably require you remove the fan and maybe even the box to be sure it either is part of a fan bracket or attached directly to a beam, joist, or 2x4 placed for the purpose of supporting a fan.

If you don't have access to your attic to add a 2x4, consider a bracket designed to be added through the hole in your ceiling. These brackets are great for retrofitting.

Is the box too low (not fully recessed)? This is a common problem in my house and older homes in general. In this case you can often find a shallow box. When installing a new box, be sure it's designed for holding a fan.

Can you get by with a medallion? Sometimes these look nicer anyway and, depending upon your ceiling fan and/or ceiling, you can get pretty fancy.

In my case, today, I have the issue where the box is not exactly flush but it's very close. When you're installing a fan, this can be unsightly but rarely will anyone else notice. That said, if you're installing a heavy, high power fan like I am, you need everything to line up perfectly or it's going to wobble and, at high speed, this is going to be noisy and/or disconcerting.

Sometimes the solution is mitigation between a heroic effort and a valiant one. I have an older home with no access to the ceiling from above. I could make a giant hole in my ceiling or my roof to move the 2x4 and/or add another. I could get a desk fan but I'm not willing to give up any desk space. I could give up--not an option, today, as this is my work-from-home area and, when I get back from running in the Arizona summer, I need airflow or I'm not going to think straight.

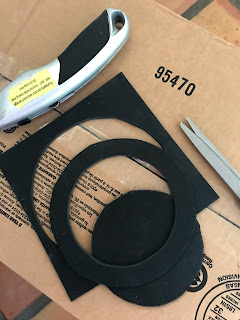
What shall we do? Today, I opted to use some rubber gasket material to fasten everything down snugly and some edging to hide the gap between the canopy and the ceiling.

Procedure

Exactly how to get this to work in any given situation will vary but the idea is to get the plate shored up against the ceiling while also connected tightly to the electrical box. For my case, with the box extending slightly below the ceiling, I needed to create a couple spacers or giant washers to get everything to meet snugly. 

Here's the basic procedure:
  1. With a pencil, trace a similar box, other item with the correct opening, or use a compass. With the right bracket, you may be able to trace the inside. Mine was a little awkward for that. I used a ceiling medallion made to fit over such a box for my template for the inside.
    (Image brightened to show pencil)

  2. For the outside, tracing the bracket should be doable. 
  3. Cut your material.


  4. Repeat if multiple layers will be necessary.
  5. When disassembling your fan, be sure to turn off the power--not just at the switch but at the breaker.
  6. Put your spacer(s) around your box and reattach hanger bracket.


  7. If using edging to hide any unsightly gasket, put it around your canopy, reconnect your fan, and fasten.

Turn the power back on and give it a go.

Before

After


Saturday, August 29, 2020

DIY Offroad Shovel Mount

 Mount your off-road shovel on your roof rack without using up valuable space


Shovel, Oar, Root Cutter, Zombie Decapitator, Murder Spork

Whatever you call it, you need it to be pretty handy; however, it gets extra dirty so you don't want to keep it on the inside of your vehicle. And, if it's the best gravel shovel you've ever had, it wasn't cheap and you don't want to lose it.

Update: If you're looking for the shovel shown, it's the Krazy Beaver Shovel.

Parts


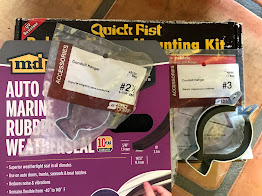
Wanting my shovel to be handy but secure, I went with a combination of mounting clamps, conduit clamps, and stop nuts. To minimize the scuffing of the rack's paint, I used marine weather stripping.

Note: I also looked at ground clamps. Those things are mean looking and, while I don't doubt they'd work well, they are a bit pricey.

Sizing for the Clamps

You can try to eye the diameter like a lot of people do with a typical metal tape measure but I prefer to wrap a flexible tape measure around the tube and measure the circumference. I know you don't need me to do your algebra for you but, if you just want to double check the math you came up with:
2πr (radius) = πD (Diameter) = C (your Circumference)

 D = C/π

Luckily, the conduit clamps give you a lot of room for error so you just need to be in the ballpark.

Stop Nuts

Generally, conduit clamps come with a carriage bolt which is great but a nut that might not hold up to off-road vibration--typical conduit applications aren't mobile. Find yourself some stop nuts at the hardware store that fit these bolts. I like the nylon insert nuts but there are a lot of options.

Assembly

This part is pretty intuitive but I'll throw out some general advice:
  • Use a generous amount of the weather seal on the inside of the clamps attaching the seal to the clamp--not the tube.
  • Again, use stop nuts. We don't want to lose anything on the trail.
  • I recommend the use of a padlock or gun lock not just to deter would be thieves but for that added security that, if anything else fails, the shovel will not be lost.
  • When locking, if your shovel disassembles, consider how many sections/pieces are necessary to secure. 


Sunday, August 16, 2020

DIY Retro Phone & Watch Charger Dude

Make a lamp that charges your watch and holds your phone.


Forewarning

This project is a little more advanced than your basic pipe lamp when it comes to wiring. I'm not saying you should let that stop you--you can borrow a competent friend for assembly; however, someone needs to be aware of the difference between ground, hot, load, neutral etc. and the implications of getting these things wrong. Also, please don't forget to unplug your creation before servicing it in anyway.

Picking your parts

Box

I used a double gang electrical box with plenty of knock outs. Consider that some boxes have knockouts that can be 1/2" or 3/4" which is pretty convenient. In theory, you could make this work with a single or triple gang box. You could even use an octagonal box if you can find the right face for it.

Pipe

Another place you can get creative is in the pipe. There's black pipe, galvanized pipe, brass fittings, and even copper or PVC. Assembly for copper and PVC would be a bit different though. You could use conduit fittings as well. You can see I used black pipe exclusively but, with some exploring at the hardware store, you can often get different types of fittings to mate up well enough. We're not making something weatherproof here.

When it comes to the size of your pipe, you'll want to pay attention to which knockouts you plan on using in your box. My box has 1/2" and 3/4" knockouts but I only used the 3/4" ones.

For reference, I used these fittings in 3/4":
  • 2x 45° FPT to MPT street elbows: where the two arms come out
  • 2x 90° FPT to MPT street elbows: where the legs attach to the "hip"
  • 1x 90° FPT street elbow: to support the watch charger
  • 1x FPT Tee: for the "hip"
  • 1x 3" pipe: from the "hip" to the box
  • 2x 4" pipes: for the legs
  • 2x caps: for the "feet"
  • 1x 3/4" to 1/2" reducer: for the lamp holder

Lamp Holder

You can see I went with a simple, gray lamp holder. You can get these in a variety of colors or you could use a different style but these can connect nicely with 1/2" knockouts in your box. In my case, the knockout I wanted to use was 3/4" only so I used a black pipe to adapt from 3/4" to 1/2".

Bulb Considerations

I love the "Edison" style bulbs. If you live in a warm area like I do and are concerned out the heat given off, you might want want to go with an LED one. These are more expensive and generally don't look as interesting as their incandescent equivalents but they use less power too. On the other hand, the LED ones have their own flare.
Edison Style LED Bulb
Edison Style Incandescent Bulb

Phone Holder

I really like the X-Grip by RAM. These have gotten pretty expensive since I first started using them. Another holder I think would look great here is the iBOLT Roadvise. If you want your phone-holding arm to be fairly articulating, you'll also want to get a socket arm. In my next such project, I think I might use one of these composite socket swivel arms.

Another approach is to simply put several high power, neodymium magnets back to back and put a slim metal plate in your case or on the back of your phone. I have this in my car so I just place my phone on the magnet and it stays--even off-road. When I'm getting out of the car, I just grab it. For this little guy, I felt the X-Grip added a nice "hand"-iness to the look.

Outlet

You will probably want an outlet with USB ports and A/C outlets, if you plan on being able to plug in other chargers. I recommend the Decora style for simplicity in getting a plate. This is the one pictured.

Switch

I wanted something with a dimmer and I like light switches that have a subtle light on them when the switch is off to make them easy to find in the dark. Again, I recommend the Decora style for simplicity in getting a plate. This is the switch I used.

Wall Plate

I went with a Decora style brushed metal wall plate.

Wire & Wire Nuts

You'll need some basic wire and wire nuts. Solid wire works better with wire nuts and connecting to fixtures in my opinion but I got stranded for general use. 

Power Cord

Don't forget, you'll want a grounded--that is a 3 conductor--cord. You can't get away with a 2 conductor like you could on your basic lamp. I like this cord because of the vintage cloth wrap.

Squeeze Connector and Nuts

I used a squeeze connector to get my power cord into my box. There are other styles. The sizing on these seems to not be as simple as everything else. Make sure you get the size you need or buy a couple if in doubt--that's what I do.

Halex lock nuts. These need to match the size of your pipe where it enters your knock-outs. I used a lot of these. 8 to be precise. See assembly below.

USB Cords

I went with the braided cords because I thought they brought a little something. This 4ft red lighting cable because of how it stands out. For the watch charger, it was tough to find a short, braided one that worked. This is what I ended up with.

Bottle Caps & Magnets

To attach the watch charger, I used a bottle cap and 1" magnets. I'm not a fan of glue but a glue gun would certainly be an option.


Assembly

Attaching your Pipes to the Box

Short of the wiring, most of this goes together very intuitively and you don't have to run wire through pipe so that's plus; however, the big trick for me was getting these heavy pipes to attach snugly without protruding more than couple mm or so into the box. Simple, conventional outlets and switches are pretty slim; however, an outlet with the hardware to run some USB plugs gets chunky and a dimmable light switch is much the same--bulky. 

You'll find you have little room between the fixtures and the walls of the box and not much room for the pipe to be attached. I used Halex nuts threaded minimally on the inside of the box and then another one tightened from the outside. Make sure these are tight and the exterior pipe mostly at the desired angles. You won't have any room to tighten them from the inside once the outlet and switch are attached to the box.


Fixtures and Wiring

Attach your squeeze connector and lamp assembly before putting in your fixtures.


Next, I recommend bringing in your power cord through the squeeze connector and wiring everything up with the wire nuts.

Attach your fixtures to the box and then tighten your squeeze connector.

Now you can put on your wall plate.

Watch Charging Support "Hand"

I used a bottle cap with two 1" diameter magnets to make the watch charger easily removable. You could use a glue gun instead.

To attach my bottle cap to the street elbow, I flared out the edges of the cap in 3 places until it threaded into the street elbow. Let me be clear: this wasn't easy to get just right and took several attempts.

Final Assembly

  • Thread on your watch charger holding arm. 
  • Attach your phone holder.
  • Put in your light bulb.
  • Hook up your USB cords.
Now, check out your creation.