Showing posts with label pipe. Show all posts

Sunday, August 16, 2020

DIY Retro Phone & Watch Charger Dude

Make a lamp that charges your watch and holds your phone.


Forewarning

This project is a little more advanced than your basic pipe lamp when it comes to wiring. I'm not saying you should let that stop you--you can borrow a competent friend for assembly; however, someone needs to be aware of the difference between ground, hot, load, neutral etc. and the implications of getting these things wrong. Also, please don't forget to unplug your creation before servicing it in anyway.

Picking your parts

Box

I used a double gang electrical box with plenty of knock outs. Consider that some boxes have knockouts that can be 1/2" or 3/4" which is pretty convenient. In theory, you could make this work with a single or triple gang box. You could even use an octagonal box if you can find the right face for it.

Pipe

Another place you can get creative is in the pipe. There's black pipe, galvanized pipe, brass fittings, and even copper or PVC. Assembly for copper and PVC would be a bit different though. You could use conduit fittings as well. You can see I used black pipe exclusively but, with some exploring at the hardware store, you can often get different types of fittings to mate up well enough. We're not making something weatherproof here.

When it comes to the size of your pipe, you'll want to pay attention to which knockouts you plan on using in your box. My box has 1/2" and 3/4" knockouts but I only used the 3/4" ones.

For reference, I used these fittings in 3/4":
  • 2x 45° FPT to MPT street elbows: where the two arms come out
  • 2x 90° FPT to MPT street elbows: where the legs attach to the "hip"
  • 1x 90° FPT street elbow: to support the watch charger
  • 1x FPT Tee: for the "hip"
  • 1x 3" pipe: from the "hip" to the box
  • 2x 4" pipes: for the legs
  • 2x caps: for the "feet"
  • 1x 3/4" to 1/2" reducer: for the lamp holder

Lamp Holder

You can see I went with a simple, gray lamp holder. You can get these in a variety of colors or you could use a different style but these can connect nicely with 1/2" knockouts in your box. In my case, the knockout I wanted to use was 3/4" only so I used a black pipe to adapt from 3/4" to 1/2".

Bulb Considerations

I love the "Edison" style bulbs. If you live in a warm area like I do and are concerned out the heat given off, you might want want to go with an LED one. These are more expensive and generally don't look as interesting as their incandescent equivalents but they use less power too. On the other hand, the LED ones have their own flare.
Edison Style LED Bulb
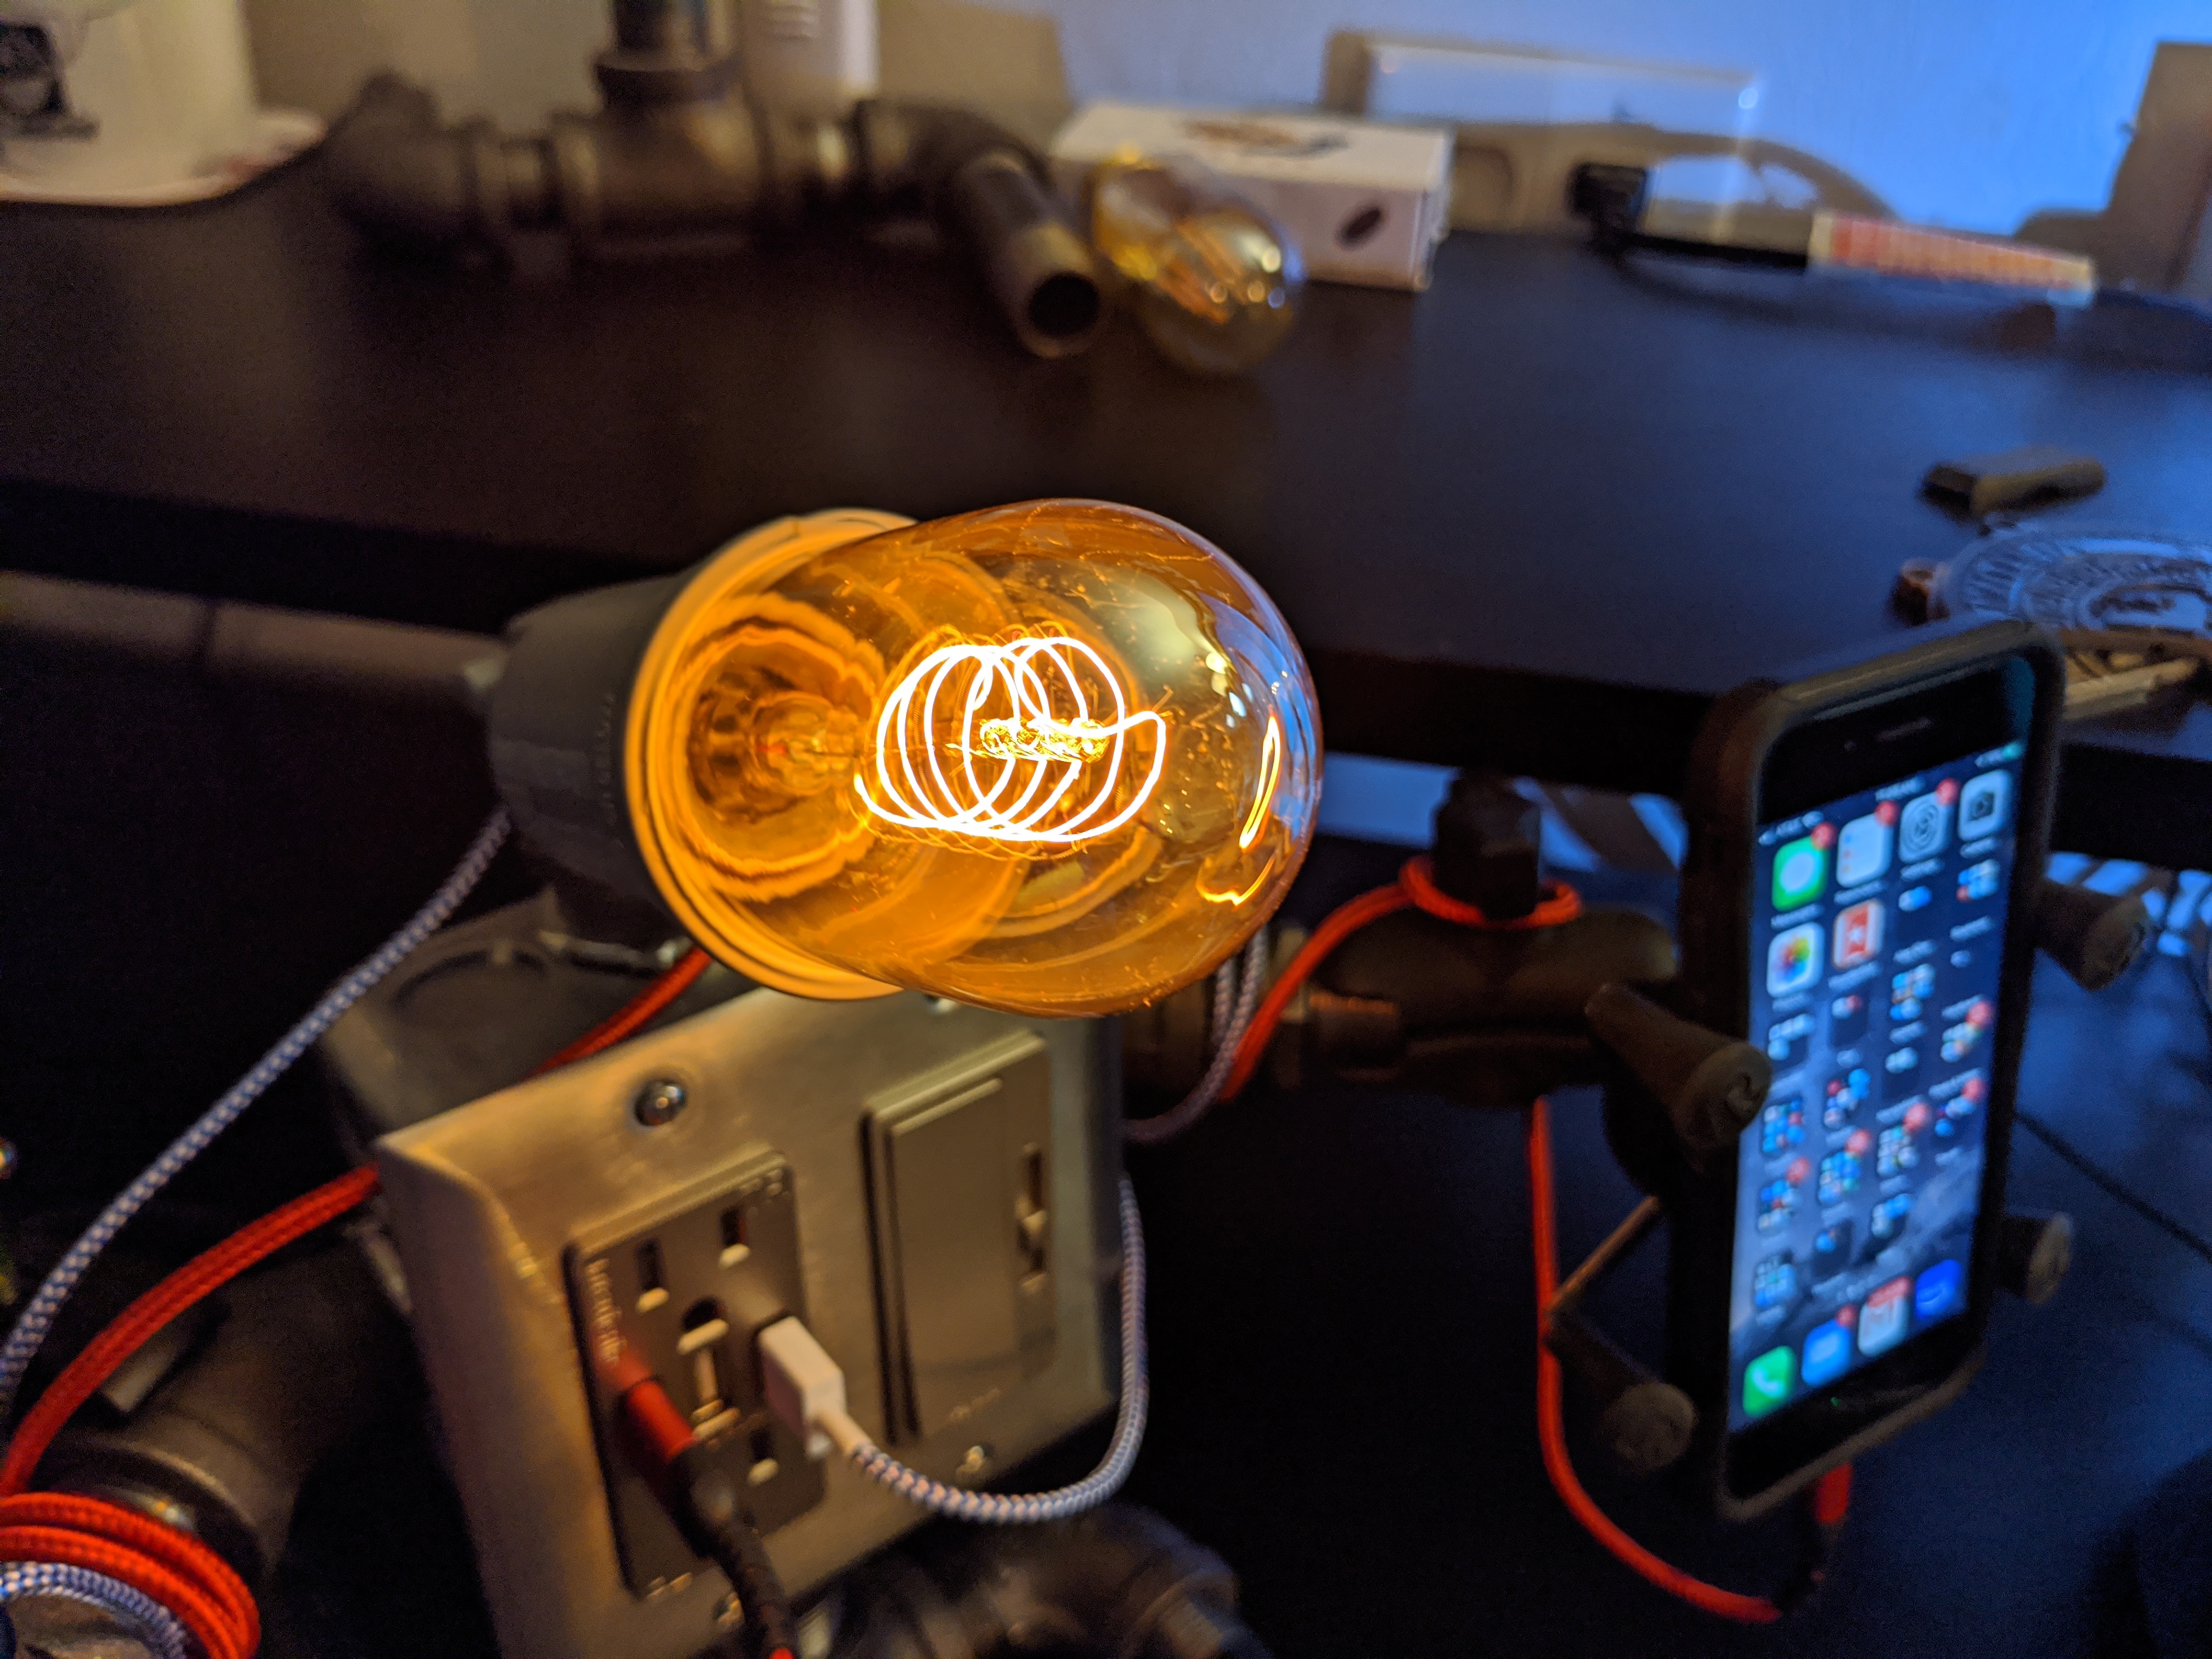
Edison Style Incandescent Bulb

Phone Holder

I really like the X-Grip by RAM. These have gotten pretty expensive since I first started using them. Another holder I think would look great here is the iBOLT Roadvise. If you want your phone-holding arm to be fairly articulating, you'll also want to get a socket arm. In my next such project, I think I might use one of these composite socket swivel arms.

Another approach is to simply put several high power, neodymium magnets back to back and put a slim metal plate in your case or on the back of your phone. I have this in my car so I just place my phone on the magnet and it stays--even off-road. When I'm getting out of the car, I just grab it. For this little guy, I felt the X-Grip added a nice "hand"-iness to the look.

Outlet

You will probably want an outlet with USB ports and A/C outlets, if you plan on being able to plug in other chargers. I recommend the Decora style for simplicity in getting a plate. This is the one pictured.

Switch

I wanted something with a dimmer and I like light switches that have a subtle light on them when the switch is off to make them easy to find in the dark. Again, I recommend the Decora style for simplicity in getting a plate. This is the switch I used.

Wall Plate

I went with a Decora style brushed metal wall plate.

Wire & Wire Nuts

You'll need some basic wire and wire nuts. Solid wire works better with wire nuts and connecting to fixtures in my opinion but I got stranded for general use. 

Power Cord

Don't forget, you'll want a grounded--that is a 3 conductor--cord. You can't get away with a 2 conductor like you could on your basic lamp. I like this cord because of the vintage cloth wrap.

Squeeze Connector and Nuts

I used a squeeze connector to get my power cord into my box. There are other styles. The sizing on these seems to not be as simple as everything else. Make sure you get the size you need or buy a couple if in doubt--that's what I do.

Halex lock nuts. These need to match the size of your pipe where it enters your knock-outs. I used a lot of these. 8 to be precise. See assembly below.

USB Cords

I went with the braided cords because I thought they brought a little something. This 4ft red lighting cable because of how it stands out. For the watch charger, it was tough to find a short, braided one that worked. This is what I ended up with.

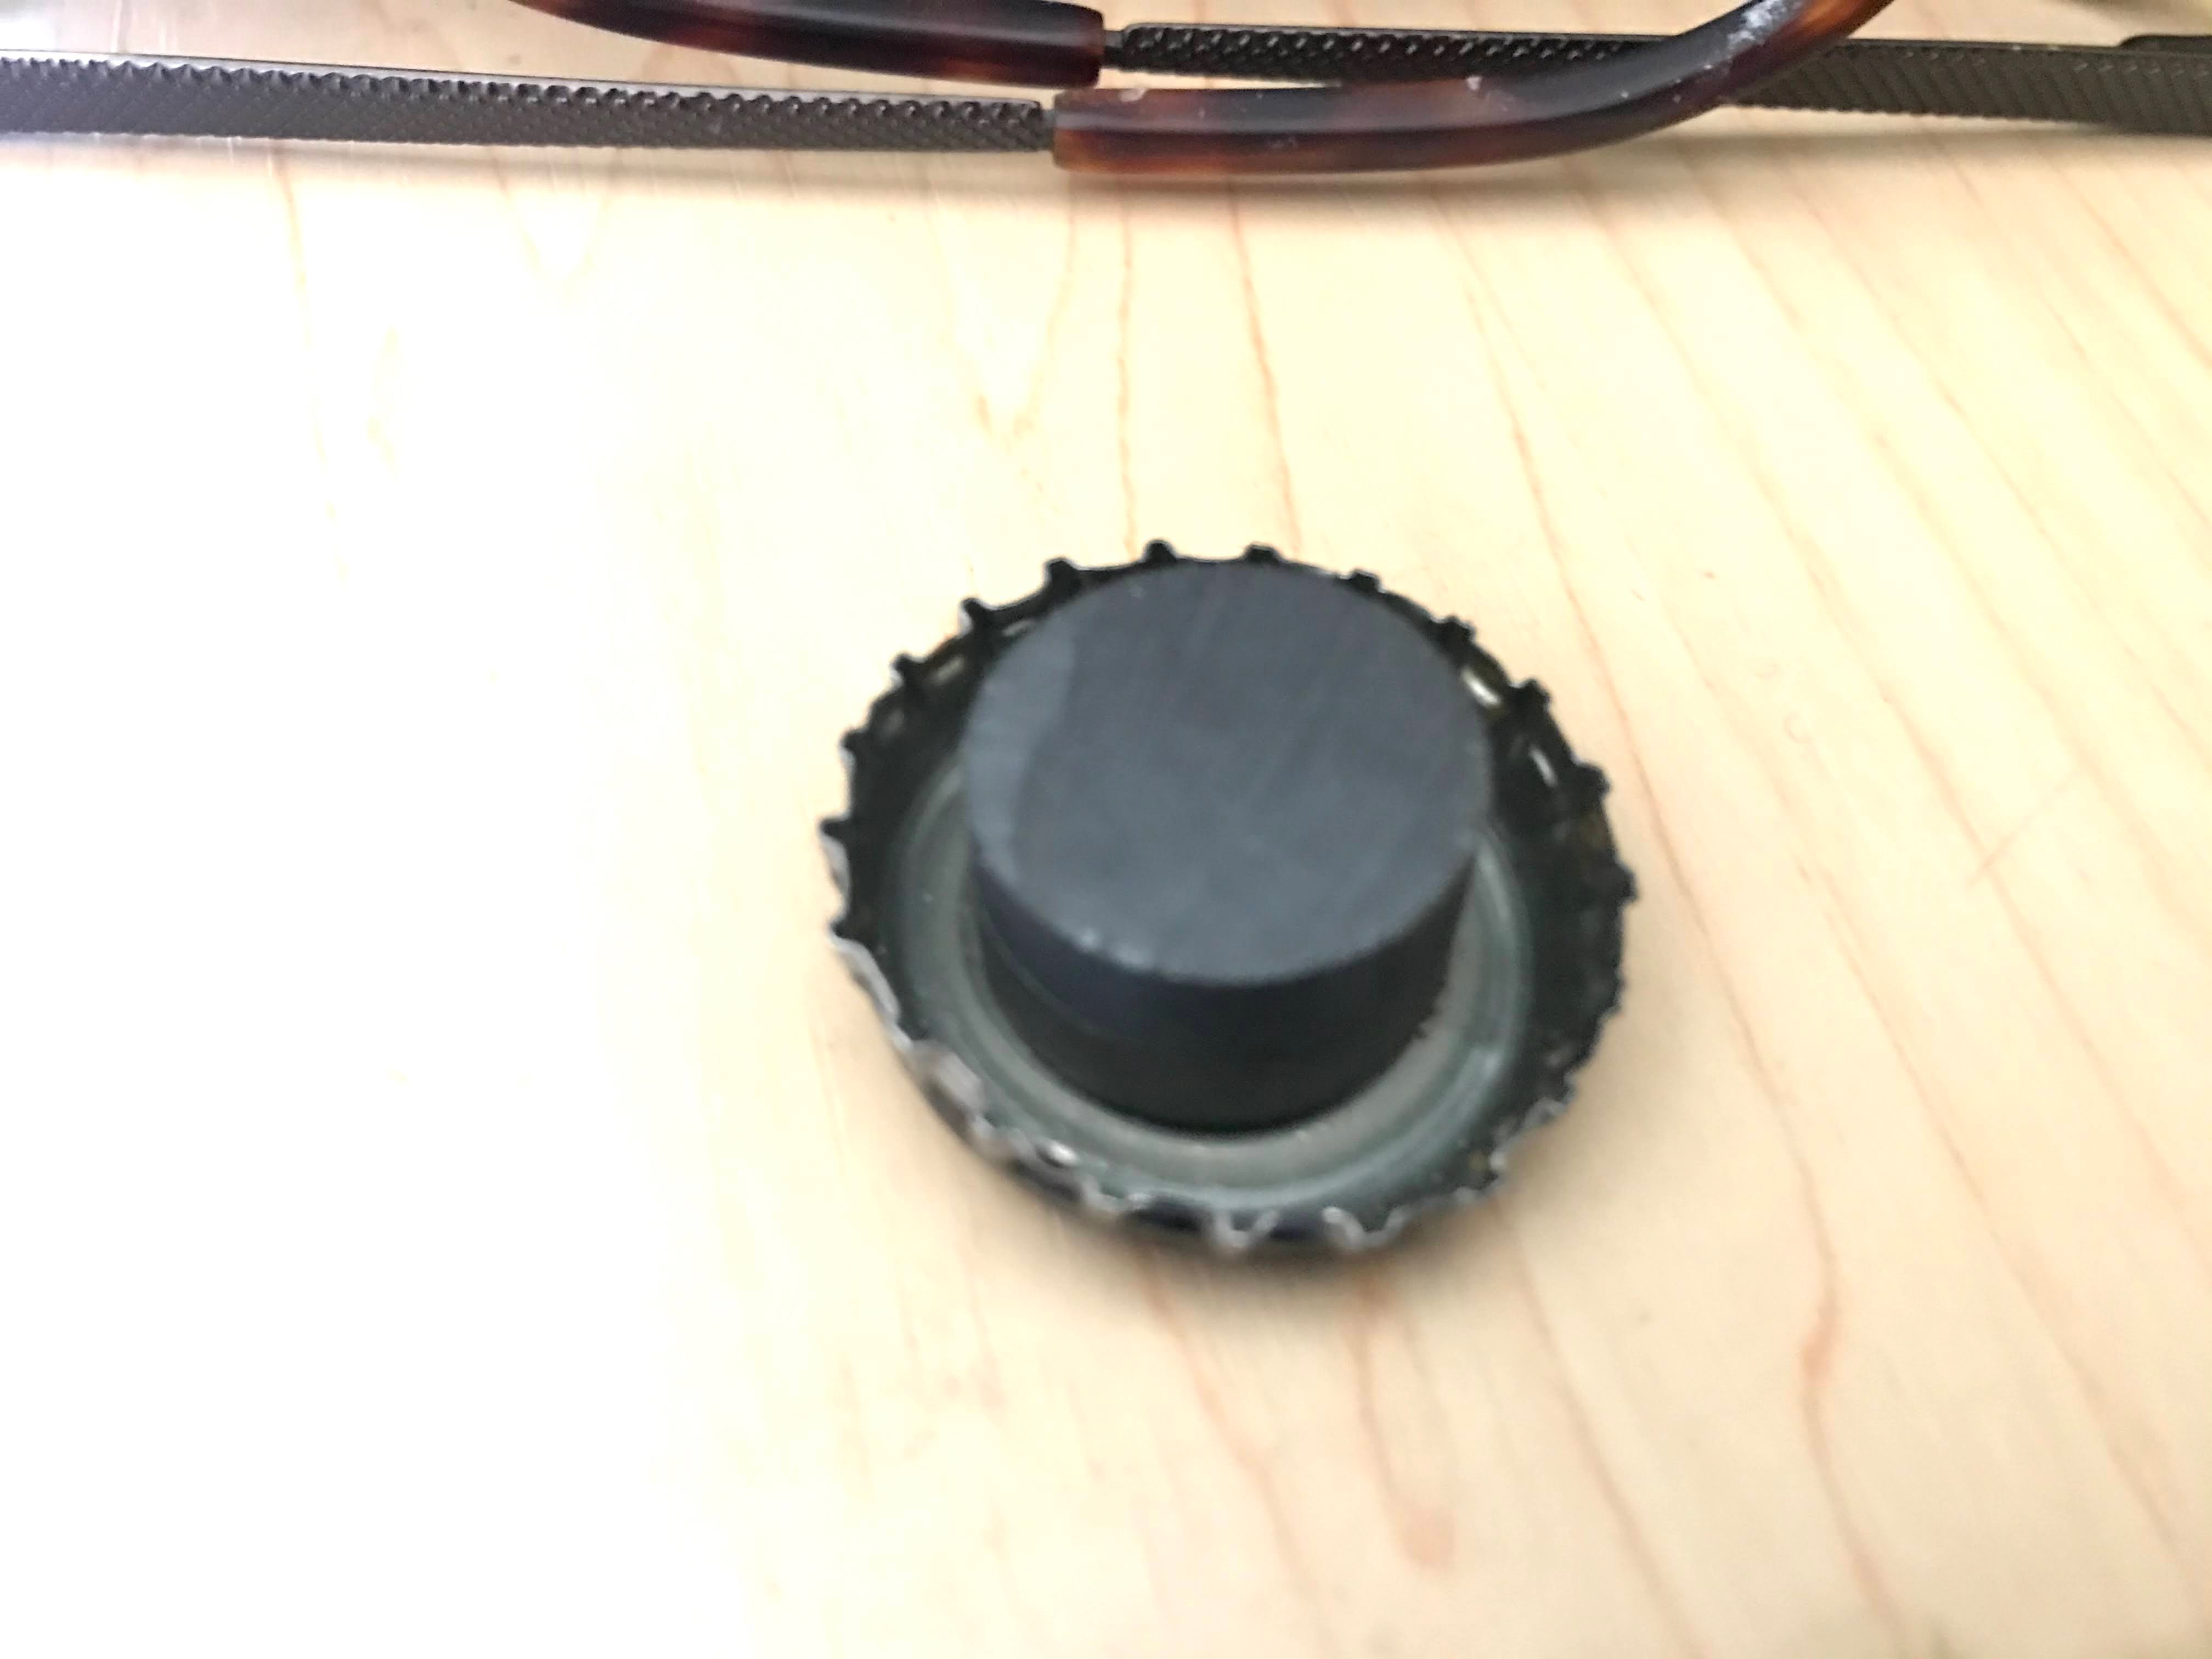
Bottle Caps & Magnets

To attach the watch charger, I used a bottle cap and 1" magnets. I'm not a fan of glue but a glue gun would certainly be an option.


Assembly

Attaching your Pipes to the Box

Short of the wiring, most of this goes together very intuitively and you don't have to run wire through pipe so that's plus; however, the big trick for me was getting these heavy pipes to attach snugly without protruding more than couple mm or so into the box. Simple, conventional outlets and switches are pretty slim; however, an outlet with the hardware to run some USB plugs gets chunky and a dimmable light switch is much the same--bulky. 

You'll find you have little room between the fixtures and the walls of the box and not much room for the pipe to be attached. I used Halex nuts threaded minimally on the inside of the box and then another one tightened from the outside. Make sure these are tight and the exterior pipe mostly at the desired angles. You won't have any room to tighten them from the inside once the outlet and switch are attached to the box.


Fixtures and Wiring

Attach your squeeze connector and lamp assembly before putting in your fixtures.


Next, I recommend bringing in your power cord through the squeeze connector and wiring everything up with the wire nuts.

Attach your fixtures to the box and then tighten your squeeze connector.

Now you can put on your wall plate.

Watch Charging Support "Hand"

I used a bottle cap with two 1" diameter magnets to make the watch charger easily removable. You could use a glue gun instead.

To attach my bottle cap to the street elbow, I flared out the edges of the cap in 3 places until it threaded into the street elbow. Let me be clear: this wasn't easy to get just right and took several attempts.

Final Assembly

  • Thread on your watch charger holding arm. 
  • Attach your phone holder.
  • Put in your light bulb.
  • Hook up your USB cords.
Now, check out your creation.


Sunday, July 24, 2016

DIY Vintage Edison Pipe Lamp

20160725_014809398_iOS20160724_222951583_iOS

I needed a light for my desk and my wife found a neat looking “Edison” lamp on line. Unfortunately, it was surprisingly expensive. I also wanted something that was dimmable which didn’t seem a common feature for these Edison lamps.

Parts

20160724_225721676_iOS

  1. 1/8” lamp nipple.
  2. A socket. There are lots of choices here. You can get one already wired to some great vintage cloth cables with a dimmer switch in addition to the key on the lamp assembly. Here’s what I used: Vintage Edison Textile Cord and Socket.
  3. An interesting bulb. They do have some great looking LED bulbs now so, if heat is an issue, consider one of these; however, even the dimmable LED bulbs often don’t look as good as an actual incandescent. Check out this one: Retro Edison Light Bulb.
  4. Some pipe. This is can be a variety of sizes but I’d recommend 3/4” or 1/2” to be large enough to pass wire through. You can use just about any combination of elbows, tees, caps, and nipples but consider having at least 1 long enough to make your lamp adequate height to keep your bulb off of the table.
  5. At least one pipe fitting that reduces down to 1/8” to fit the lamp nipple.
  6. A spigot handle. You may want to get a new one and swap it with a nice weather beaten one from outside your house.

Steps

Assembly really varies with your choice of fittings but there are a couple key things to consider:

  • You want a shape that won’t be susceptible to tipping considering you’ll have a glass bulb to support.
  • You’ll need to detach the wire from either the plug end or the socket end in order to thread it through the lamp nipple and the pipes. Some sockets can be disassembled but others are not designed for that and may require cutting and splicing the wires.
  • If you have to splice the wires, be sure to note the polarity with a marker if it’s not indicated by insulation color.

20160724_215620447_iOS20160724_215717577_iOS

Continue to pass the wire through your pipe assembly being careful to reduce the twisting tension as you go. Work the wire through your fittings tightening along the way until you get to where you want the wire to exit the system.

20160724_215845893_iOS

If you want to use a spigot handle for the switch, you’ll probably find they fit pretty well onto the “key”. You can use glue or a self threading screw to lock the spigot down. I’ve never been much of a fan of glue.

20160724_221712020_iOSimage

Tuesday, January 6, 2015

DIY Pallet Coat Rack with Shelf and Towel Bar

CR final with coats

I was telling my wife that we either need another coat rack or we’ll need to limit the kids to only 5 jackets each. And so, here we are building a new coat rack out of pallets.

Parts

  1. A pallet. Not just because they’re free. They bring a certain unfinished charm to a project but free certainly is hard to beat.
  2. Hanging hardware: heavy picture hangers, deck screws for studs, or wall anchors.
  3. Some hooks. You could use drawer pulls, bolts, pipe elbows, nails, screws, or even spickets depending on how much and what character you want to boast.
  4. Optional: If you want an integrated towel bar, galvanized pipe brings a bit of an industrial tone to this project. 2x elbows, 2x floor flanges, and a threaded pipe (about 30”).

Steps

We will have to cut the pallet across the studs to separate the portion we’re going to use for the rack. You will want at least two boards on one side and at least one on the other. I went with only one on the front. Having two would make it easier to mount things like drawer pulls as hooks that generally require nuts on the back.
CR after stud cut

For the top shelf, we have a choice. If you want a sort of cubby on top, you’ll have to cut one of your cross boards into two pieces to use as the floor of the cubby. If you simply want a shelf on the top, you can just remove one of the cross boards. For mine, I went with the cubby so here I cut the cross boards at each stud making them the perfect width to fit between the studs.
CR after cross board cut

For the cubby, insert your boards between the studs and cross boards to form the cubby floor. For the top shelf option, place your cross board along the top of the rack. Attach the floor with screws, nails, or brads.
CR cubby bottomCR cubby top

Now is a good time to sand down the rough surfaces. This particular pallet needed quite a bit of sanding.
CR sanding

All that’s left is to attach your hardware—the coat hooks and, optionally, the towel rack. When hanging your rack, some things to think about:

  • How long are your coats?
  • Are your kids going to be hanging jackets on this? How high can they reach?
  • At what height is the top rack accessible?

There are a lot of ways you can hang the rack. You can use heavy picture hanging hooks, loops, etc. or you can put a couple screws through one or two of the cross boards. In my case, I used deck screws into the wall studs.
CR final without coats

Saturday, January 3, 2015

DIY Pallet Liquor Rack

WP_20140621_09_10_22_Pro

This is a relatively easy project using a pallet that can produce two liquor racks with very little pallet disassembly, minimal cutting, and minor drilling. It may not fit all your bottles but a good, sturdy, wide pallet can hold a lot of them. The rack pictured is made from a 4ft wide pallet.

Parts

  1. A pallet. Generally available for free. Most places recycle them so ask before you grab. Often, they’ll have a pile you can take from and another that you cannot. Otherwise, look up your local pallet recycler.
  2. Approximately 12 deck screws per rack. It partially depends on how many studs your pallet has. There are 4 studs in the racks pictured above.

Steps

Pallets differ quite a bit so not all pallets may be optimal for this project. What you want to do is identify which side will be the back versus the front of your rack. Things to consider are the sizes and placement of the cross boards as well as the condition of the wood. With regard to the size, I wanted the smaller board to be the front of my rack to show as much of each bottle as possible.

Remove extra boards from what will be the front of your rack. Generally, you’ll want one board at the front, bottom of your rack and two in the back. If there aren’t any boards in the way, you’ll still need to remove at least one from elsewhere on the pallet—we’ll be using this as the bottom of the rack.
LR pallet disassembly

Next, cut the studs to separate your rack from the pallet. I like to use a reciprocating saw (or sawzall) and cut adjacent to what will be the upper cross board. Avoid cutting through any nails and wear eye protection.
LR pallet cutting

Place the cross board you removed earlier over the bottom of the rack. This will support your bottles. It should already have holes where the nails were that line up well with the studs. If the pallet is asymmetrical, you might have to flip the board around to get the holes to line up. I recommend drilling through the holes into the studs and then screwing in at least two deck screws per stud.
LR install bottom board

Your rack is all but finished. You will probably want to sand it down and may want to varnish it. For this particular rack, I just sanded the rough edges and did not varnish it. I was worried about the green paint but, in the end, I think it went well with the final look.
LR bottom installed

To hang it, using two deck screws in each of the back cross boards into wall studs would be ideal. I recommend drilling and countersinking for the best strength. When loaded, your rack will be supporting a pretty heavy and delicate load.
LR hanging

Ideas for finishing touches:

  • A bottle opener.
  • A magnet to catch the caps that fall from your opener.
  • A small hook for corkscrews and such.
  • Some galvanized or black pipe attached by a floor flange makes a great hanger for a bar towel.
  • An LED light strip to illuminate your bottles.

LR extras