Fan wobble can be unnerving, frustrating, and even scary. Sometimes it's associated with disconcerting noises and sometimes it's just distracting. For me, I figure too much movement is going to cause a problem with fasteners eventually.
What can you do?
First, we need to figure out the problem. Consider these common problems:
Is a blade bent? Sometimes a new blade can be all it takes.
Is everything fastened tightly? Sometimes those screws that were tight initially have loosened up due to compression of parts.
Is the box designed for a fan? This may require fan removal but better to be safe than sorry.
Is the box properly supported? This will probably require you remove the fan and maybe even the box to be sure it either is part of a fan bracket or attached directly to a beam, joist, or 2x4 placed for the purpose of supporting a fan.
If you don't have access to your attic to add a 2x4, consider a bracket designed to be added through the hole in your ceiling. These brackets are great for retrofitting.
Is the box too low (not fully recessed)? This is a common problem in my house and older homes in general. In this case you can often find a shallow box. When installing a new box, be sure it's designed for holding a fan.
Can you get by with a medallion? Sometimes these look nicer anyway and, depending upon your ceiling fan and/or ceiling, you can get pretty fancy.
In my case, today, I have the issue where the box is not exactly flush but it's very close. When you're installing a fan, this can be unsightly but rarely will anyone else notice. That said, if you're installing a heavy, high power fan like I am, you need everything to line up perfectly or it's going to wobble and, at high speed, this is going to be noisy and/or disconcerting.
Sometimes the solution is mitigation between a heroic effort and a valiant one. I have an older home with no access to the ceiling from above. I could make a giant hole in my ceiling or my roof to move the 2x4 and/or add another. I could get a desk fan but I'm not willing to give up any desk space. I could give up--not an option, today, as this is my work-from-home area and, when I get back from running in the Arizona summer, I need airflow or I'm not going to think straight.
What shall we do? Today, I opted to use some rubber gasket material to fasten everything down snugly and some edging to hide the gap between the canopy and the ceiling.
Procedure
- With a pencil, trace a similar box, other item with the correct opening, or use a compass. With the right bracket, you may be able to trace the inside. Mine was a little awkward for that. I used a ceiling medallion made to fit over such a box for my template for the inside.(Image brightened to show pencil)


- For the outside, tracing the bracket should be doable.
- Cut your material.
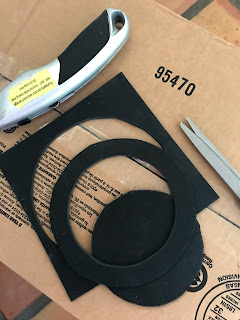
- Repeat if multiple layers will be necessary.
- When disassembling your fan, be sure to turn off the power--not just at the switch but at the breaker.
- Put your spacer(s) around your box and reattach hanger bracket.

- If using edging to hide any unsightly gasket, put it around your canopy, reconnect your fan, and fasten.


No comments:
Post a Comment