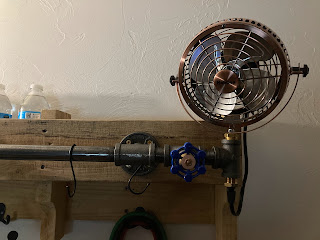
Recently, I made a new rack for behind my indoor bike. I wanted a place to hang things but also wanted an easy to access light and fan. Spigot switches made it very accessible while still sitting on the bike and add a nice industrial touch.
In the past, I've done a post on making a coat rack so what's new here is simply the application of the spigot switches and use of light and fan.
To make these switches, I used:
- A rotary switch
- A 3/4" sillcock valve. (used one from Home Depot (blue) and one from Ace Hardware (red))
- Some 1/2" inner diameter (5/16" outer diameter) clear vinyl tubing (from Home Depot)
- A 3/4" close nipple (sizes vary) (from Home Depot)
- A washer (I had this already but any hardware store)
- Optional glue for making sure threads don't loosen but we will not use glue to attach the spigot handle to the switch.
I hate glue and don't find it reliable long term. That said, it has its uses. In this case, the hose takes one aspect out of the gluing where I find it would typically fail--attaching the rotary switch to the sillcock valve.
After disassembling the stem from the valve, I removed the screw and washer from the stem to give myself just a little more room to work with but it's not vital unless you find space is an issue.
To attach the rotary switch to the spigot handle, cut a small length of the vinyl hose and shimmy it on both. In my case, my rotary switch was a little larger and tough to get the hose onto so I cut a 1/4" slit from the end to give me a little wiggle room to get it on.
Keep in mind, close nipple sizes vary from manufacturer to manufacturer. I found the ones from Home Depot were a little longer than the ones from Ace. In my case, I needed a little extra room so I went with the larger one.
Here, you can see everything threaded over the wire: the nipple over the wire coming out of the switch/spigot assembly and the washer that'll hold the assembly in the nipple with the nut and lock washer from the switch trailing behind.
Now, you may want to put some epoxy or glue between the big washer and the nipple and/or on the rotary switch threads to keep it from slipping over time. I did not and one of my two switches has gotten a little loosey goosey so I'm probably going to have to go back in and add a dab of glue unfortunately.
Wiring your switch to operate a lamp, fan, or other device requires a little knowledge of home electrical wiring. Obviously, always work with everything unplugged and be sure to be aware of which side of your circuit is the "hot" side.


